1962 Morris 850 'Mini'

↑ HMT541 turns its wheels for the first time in 18 years being picked up from Maryborough Vic for the short 26km trip to its new home at Kelly St Classics in Avoca
Documents show the 66881 miles on the odometer are almost certainly correct. For all its travelling life, until 2002, it was owned by Mrs Jean Hill, who purchased it after winning £1000 (yes 1000 POUNDS!) in an interior decorating competition in the Womens Weekly. She and husband Don ran a printing business and a stationery and giftware shop in Horsham, Victoria, and Jean was a talented artist and active in the local community (also a popular Girl Guides leader) and many Horsham locals remember seeing Jean and her blue Mini around town. It is extremely likely the car was purchased from the Horsham BMC dealer, Duldig Motors (click here for a photo of the dealership and the 'dealer sticker' I have designed for the rear window).
 Daughter
Robyn recollects that the Mini was much-loved by the family, and that
it took them to many places, including to Melbourne June 14th 1964 to
stand in the street and wave to The Beatles in front of the Southern
Cross Hotel! (I wonder if Jean and daughter Robyn are in this
newspaper photo from the day↑ )
Daughter
Robyn recollects that the Mini was much-loved by the family, and that
it took them to many places, including to Melbourne June 14th 1964 to
stand in the street and wave to The Beatles in front of the Southern
Cross Hotel! (I wonder if Jean and daughter Robyn are in this
newspaper photo from the day↑ )
The Araluen Blue Mini became quite an icon in Horsham, until 1997 when she and husband Don moved to Maryborough. She continued to drive the car occasionally in Maryborough, but in 2002, aged 85, it was decided she would stop driving, and the car was sold to a local 52yo Maryborough Mini enthusiast who drove it home and parked it in his garage with the intention of restoring it.
18 years later, at the age of 70, that enthusiast realised he was never going to get around to it, so he enlisted his grandson to advertise it, and 4 hours later I agreed to purchase it!
Jean Hill continued to live an active life until just weeks before she died in 2018, aged almost 102.
I have long wanted a really original Mini, but never found the right one. I think this little gem might just fit the bill and fit in with the Kelly St Classics.
Once in the workshop and given a detailed appraisal I will determine just how original I can keep this delightful Mini. A car that has been loved this much all its life deserves to continue to be loved and preserved. It's the least I can do for Jean Hill.
Stage 1; First job is one of the worst and most messy - pressure washing the engine bay, and then (the really horrible bit) the undercarriage when up on a hoist. Often this process reveals depressing realities; in this instance, pure joy! As I'd determined during the pre-purchase inspection, the only rust is in the bottom of the battery box!


Stage 2; Strip the suspensions back and front, and yet another full day of removing 40 years' worth of oil, grease and dirt buildup (the car was last driven in 2002). All rubber boots and seals need replacing simply due to age, but the condition of all original ball joints, CV joints, tie rod ends etc is absolutely amazing!


Stage 3; Brakes and steering and suspension rubbers all replaced. I then removed all hinged panels and glass to be able to replace the much-hardened original rubbers and seals. This close work also revealed many small dents, most of which seemed to be from careless storage from the last 20 years rather than from its previous active life - marks on the roof and bonnet from objects obviously stored on it, and a couple on the sides where things must have fallen against it. Almost imperceptile, but annoying.
I initially thought I'd leave them to retain 'originality', but eventually decided the car would be better served by properly repairing the imperfections with a hammer and dolly (which meant carefully removing the headlining and interior lining boards, which will be carefully cleaned and refitted), spraying all internal and folded sections with good preservation materials, and then doing a thorough but sympathetic respray of the topcoats, rather than doing spot repaints of rectified areas. This also gave me a chance to remove all nuts and bolts, which were still OK, but would almost certainly have rusted and seized if I'd left them for another 50 years!
This process has let me in awe of the incredible quality of the original factory paint job, and also of the incredible lack of rust in this beautiful shell! It also gave me the chance to rectify some damage that had been 'fixed' by a panel beater many years ago, obviously from damage when the driver's door must have opened past the limiting strap and damaged the A panel. Two solid days of careful massaging of the internal and external skins of the A panel back to the correct shape (after removing a lot of filler the 'panel beater' had used) returned the area back to its proper shape.


↑ Back on its wheels to go out in the sunshine
for final wet sand before final primer-surfacer and eventual colour
coats (once the weather warms up again in 6 months or so).

↑ This gave a chance to clean the floors.
Check out the original factory paint other than some 'red lead' on the
driver's floor!


↑ Even the driver's floor area treated with
'red lead' primer by the original owner is sound. No rust repairs
necessary.

↑ All original paint in the boot. Some chips
and scrapes from being used, but no rust other than the bottom of the
battery tray (to be expected).

↑ All grey again. Final primer/surfacer before
eventual topcoats (once weather warms up again to avoid humidity
blisters down the track).
Stage 4: At this point,
plans once again changed. I decided to do things properly I really had
to drop both front and rear subframes to enable me to properly prepare
and paint the engine bay and underfloor areas, as well as properly
repaint the subframes and remove any trapped dirt, The 2-post hoist
made it a breeze, lifting the body up...


↑ ...and up...

↑ ...and then take the whole assembly out with
the forklift for a thorough pressure-wash. The same was repeated for
the rear.

↑ This enabled me to really clean the
underneath, using degreasers, a pressure washer and plenty of
scrubbing to remove 58 years worth of grime. Front view...
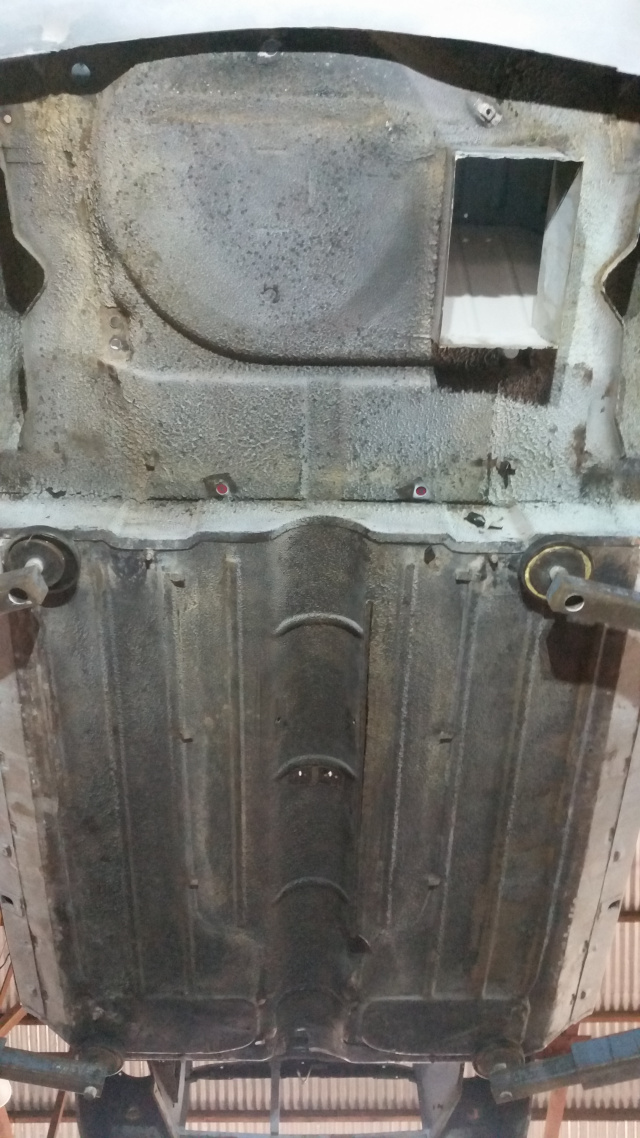
↑ ...and rear. I decided in the early stages
to avoid sandblasting and any other aggressive stripping processes, as
the original finishes and primers are in remarkable good condition,
doubtless because of the Rotodip process used on these cars in
production, which would be a shame to destroy. An illustration of the
Rotodip process appears below.

↑ With such a rust-free and original shell I
really wanted to keep the original primers and base coats in place!
The Rotodip process used by BMC at the time was extremely effective!

↑ Then it was time to clean the old 'red lead'
primer someone had thankfully painted on the driver's floor many years
ago to prevent rust, and do some minor panel-beating to remove some
dents on the beautifully rust-free floor. Unfortunately this meant
removing the Rotodip coatings in this small area...

↑ ...but it was immediately etch-primed, ready
for later primer-surfacer and topcoats.

↑ The underfloor areas where the original
sealant/rust-preventative/sound-deadener had come away were also
primed, before a stiff-bristled brush was used to stipple a thick,
fibrous bitumenised coating on to emulate the original factory
sprayed-on finish.

↑ This picture shows the 'missing' areas of
underseal replicated by hand...

↑ ...before a small spray gun (that could get
into all nooks and crannies and had an adjustable-angle feeder pot)
was used to thoroughly spray the whole underbody area, giving special
attention to hidden areas, joins, and any shrinkage cracks in the
original underseal, to completely seal and bind the whole lot
effectively.

↑ Here is the completed underbody area (except
for the battery tray which still needed to have an accurate base
fabricated and welded into place). Click
here to see the details on the battery box restoration (it's
pretty interesting!)

↑ Front and rear subframes were stripped
completely and repainted, and I managed to retain this charming
(although invisible when refitted!) original MOWOG stencil on the
front of the front subframe.

↑ Steering rack shows a production date of
December 1961. All other UK-made components also had 1961 date stamps,
including...

↑ ...cylinder head (30 Nov 1961),


↑ ...brake drums (varied between 28 Jan and
15 Dec 1961),

↑ ...radiator (Nov 1961),

↑ ...ignition coil (Dec 1961), and...

↑ ...distributor (Nov 1961).
Careful inspection of the wheels and glass revealed similar dates, but with a twist!
Click here to see the wheel information, here to see the glass information.

↑ Removing the cylinder head as a precaution
showed original pistons and bores to be in perfect condition!
Definitely original mileage.

↑ Detail of original piston tops.

↑ The rebuilt rear subframe was reinstalled
after the underside was repainted as per original, with grey primer
covering the bituminous underseal, but body colour only reaching
partially underneath as 'overspray' from the body painting. In this
instance it's being done in reverse, as I wish to undertake the main
body painting in much warmer and less humid conditions in coming
months.

↑ Another photo of the refitted rear subframe.
All rubbers, brakes, shock absorbers and brake hoses were replaced.

↑ Front subframe rebuilt with new rubbers,
hoses and brakes. All the original CV joints, bearings, and suspension
cones were still perfect due to the low mileage the car has covered,
so were retained.

↑ The engine was reinstalled after new exhaust
valves were fitted to the head, and all valves lapped into their
seats. After much deliberation, I decided not to repaint the engine,
but rather leave the remainder of the original factory paint for
originality.

↑ The rear view. Only the cast iron manifold
was refinished to arrest corrosion. I use 'cast iron' finish high-temp
ceramic which lasts really well.

↑ The complete front subframe was then wheeled
under the body, which was then carefully lowered into place and bolted
up.

↑ The car was then wheeled out to be thoroughly cleaned of workshop dust, and to have the body preparation finished before the colour coats are applied. It is amazing how many tiny defects show themselves under various light sources and directions!

↑ Eventually the colour coats start being applied. I use acrylic lacquer. Normally 3 coats initially, then a good rest in hot sun for some days to allow any shrinkback of primers, fillers etc, then wet sanding with 600grit wet-and-dry, and then 3 further coats, nice and wet to allow flow, but not wet enough to cause runs.

↑ While the final coats are baking in the hot Australian sun for some days, I pulled the 1962 Austin A40 Farina out of the restoration queue to start a very light restoration. Not only is this car also finished in Araluen Blue (plus a white), but until now I hadn't realised that both cars were first registered on the same day - March 30 - in 1962!.

↑ At this time I also prepared a strong caustic solution to gently strip the paint from the original wheels. I'm not a fan of sandblasting items such as this, that have quite shallow and delicate stampings to identify their date of manufacture etc. Each wheel takes about 24 hours for the Old English White enamel to fully soften for easy removal with a rotary nylon brush mounted in a drill.

↑ Here is the cleaned face, showing the markings as fresh as the day they were done..

↑ The rear just requires a good, messy application of elbow grease, sweat, and various rotary wire brushes.

↑ Then etch-primed, front...

↑ ...and back

↑ ...I then sprayed the rears with a light coat of satin black lacquer, and the faces with a light coat of Old English White lacquer, before having a new set of 5 Dunlop SP10 radials in the correct 145SR10 size (82 aspect ratio).

↑ Here's a closeup of one of the newly fitted Dunlops. These are unavailable in Australia, where generally only light truck type tyres are available nowadays in the 145 width, other than some very expensive offerings from specialist vintage/classic tyre sellers.

↑ A detail of the tread. Accurately remanufactured in Japan by Sumitomo, under a reciprocal agreement. These are extremely high quality, and needed almost no balancing weights.

↑ Here is the label that each tyre had.

↑ Yes, sourced, at a very reasonable cost, directly from Japan (eBay), and fast shipping (all inclusive in the purchase) by DHL.
Watch this space for the next development!
Click here to see the wheel information, here to see the glass information, here to see problems with some modern windscreen seals, and here to see battery box repair.